FCM(Firebase Cloud Messaging), Android, Spring-Boot 3가지 구성으로 간단한 Push-Notification 테스트를 실행합니다.
목표로는 아래와 같습니다.
1. FCM 계정 생성
2. Android-Studio 프로젝트 셋팅
3. Spring-Boot 프로젝트 셋팅
4. Test Message 전송 시 Notification 알람 확인
FCM 계정생성
A. Firebase에 계정 및 프로젝트 생성.(https://firebase.google.com/)
A-1) 프로젝트 생성시 아래 “Android 패키지 이름"에 유의해야 됩니다. Android Studio에 프로젝트 생성 시 설정한 패키지 명과 일치해야 Push Alarm이 정상적으로 동작합니다.
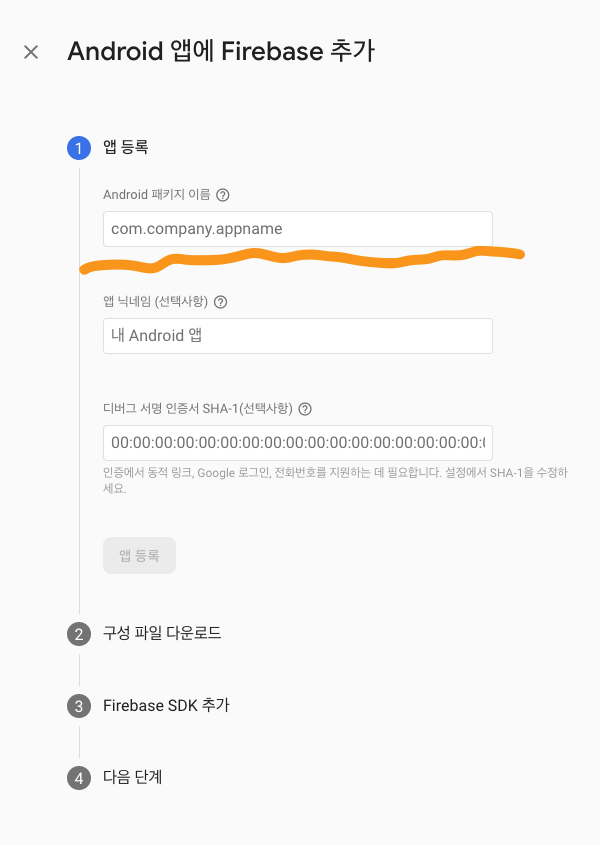
A-2) “google-services.json”파일 다운로드
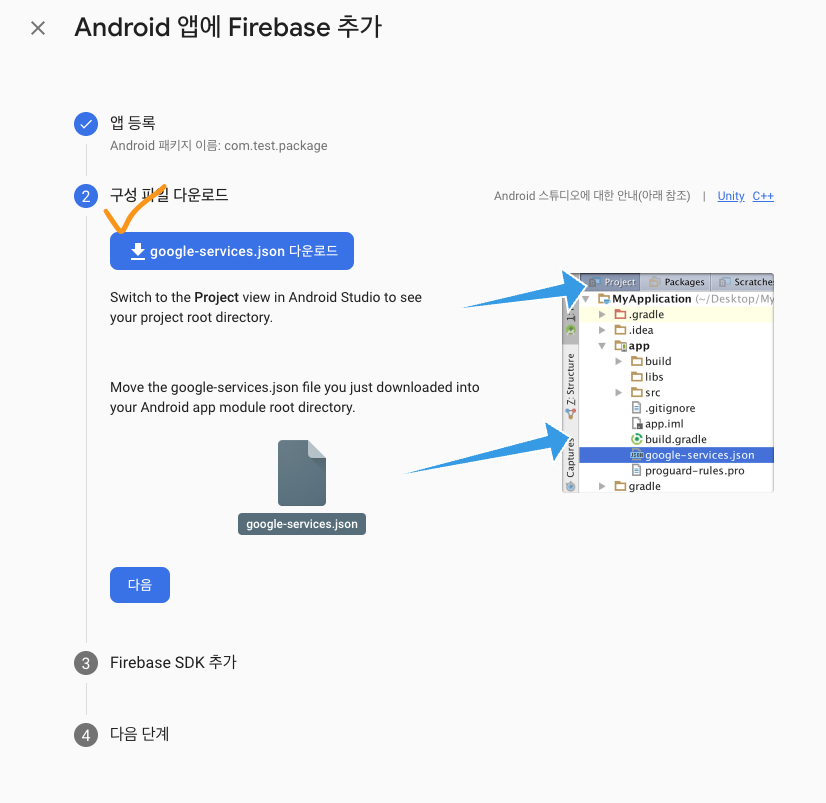
주의사항 : google-services.json 파일내 “package_name”이 안드로이드 프로젝트 패키지명과 일치해야 됩니다.
A-3) “Firebase SDK” 관련내용 Android Studio build.gradle에 추가

B. Firebase Admin SDK 키 다운로드
차후 Spring-Boot 프로젝트 내 정보를 셋팅하기 위한 용도입니다.

C. Firebase Project ID 확인
차후 Spring-Boot 프로젝트 내 정보를 셋팅하기 위한 용도입니다.

Android
(기본적으로 안드로이드 스튜디오 프로젝트 생성 및 설정이 완료되었다고 가정하고 설명합니다)
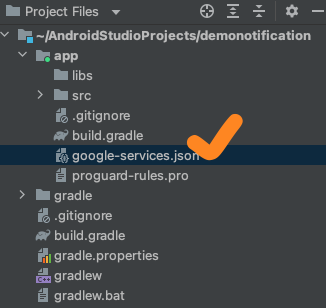
A. “FCM 계정생성 > A-2)”에서 다운로드 받은 JSON 파일 붙여넣기
B. build.gradle 플러그인 및 의존성 추가
“FCM 계정생성 > A-3)” 내용에 설명된 것과 유사하나 각 프로젝트별 상황에 따라 조금씩 다릅니다.
B-1) build.gradle(:app)
plugins {
    id 'com.android.application'
        id 'com.google.gms.google-services'
}
...
android{ ... }
...

dependencies {
    implementation 'com.google.firebase:firebase-messaging:21.1.0'
    implementation platform('com.google.firebase:firebase-bom:30.3.2')
  implementation 'com.google.firebase:firebase-analytics'
}
B-2) build.gradle(project root)
buildscript {
    repositories {
        google()
    }

    dependencies {
        classpath 'com.google.gms:google-services:4.3.13'
    }
}

// Top-level build file where you can add configuration options common to all sub-projects/modules.
plugins {
    id 'com.android.application' version '7.2.2' apply false
    id 'com.android.library' version '7.2.2' apply false
}

task clean(type: Delete) {
    delete rootProject.buildDir
}
C. MyFirebaseMessagingService 클래스 추가
생성된 Token을 이용해 서버에서 해당 Mobile로 Notification을 보낼 수 있습니다. 따라서, 프로젝트 어플리케이션 실행 시 생성된 Token 값을 꼭 확인하시기 바랍니다.
import android.util.Log;

import androidx.annotation.NonNull;

import com.google.firebase.messaging.FirebaseMessagingService;

public class MyFirebaseMessagingService extends FirebaseMessagingService {

        // token 값 확인
    @Override
    public void onNewToken(@NonNull String token) {
        Log.d("FCM Log Check!!!", "Refreshed token : " + token);
        super.onNewToken(token);
    }
}
D. 생성된 클래스(MyFirebaseMessagingService) AndroidManifest.xml에 내용추가
<manifest xmlns ~~>

<uses-permission android:name="android.permission.INTERNET"/>

    <application>

        ...

        <service
            android:name=".MyFirebaseMessagingService"
            android:exported="false">
            <intent-filter>
                <action android:name="com.google.firebase.MESSAGING_EVENT" />
            </intent-filter>
        </service>
    </application>

</manifest>
Spring Boot
A. “FCM 계정생성 > Firebase Admin SDK 키 다운로드” 저장한 json파일을 스프링부트에 셋팅합니다.
(개인적으로 “firebase_service_key” 파일명으로 수정했습니다.)

B. build.gradle 의존성 추가
dependencies {
        ...
    implementation 'com.google.firebase:firebase-admin:9.0.0'
    implementation 'com.squareup.okhttp3:okhttp:4.10.0'
}
C. FirebaseCloudMessageService 클래스 생성
import com.fasterxml.jackson.core.JsonParseException;
import com.fasterxml.jackson.core.JsonProcessingException;
import com.fasterxml.jackson.databind.ObjectMapper;
import com.google.auth.oauth2.GoogleCredentials;
import lombok.RequiredArgsConstructor;
import lombok.extern.log4j.Log4j2;
import okhttp3.*;
import org.springframework.beans.factory.annotation.Value;
import org.springframework.core.io.ClassPathResource;
import org.springframework.http.HttpHeaders;
import org.springframework.stereotype.Component;

import java.io.IOException;
import java.util.List;

@Component
@RequiredArgsConstructor
@Log4j2
public class FirebaseCloudMessageService {

    // "firebase_service_key.json" 파일 경로지정
    @Value("${fcm.certification}")
    private String firebaseConfigPath;

    // "https://fcm.googleapis.com/v1/projects/{프로젝트ID}/messages:send";
    // "FCM 계정생성 > C. Firebase Project ID 확인" 내용에서 확인가능
    private final String API_URL = "https://fcm.googleapis.com/v1/projects/{프로젝트ID 셋팅}/messages:send";
    private final ObjectMapper objectMapper;

    public void sendMessageTo(String targetToken, String title, String body) throws IOException {
        String message = makeMessage(targetToken, title, body);

        OkHttpClient client = new OkHttpClient();
        RequestBody requestBody = RequestBody.create(message,
                MediaType.get("application/json; charset=utf-8"));
        Request request = new Request.Builder()
                .url(API_URL)
                .post(requestBody)
                .addHeader(HttpHeaders.AUTHORIZATION, "Bearer " + getAccessToken())
                .addHeader(HttpHeaders.CONTENT_TYPE, "application/json; UTF-8")
                .build();

        Response response = client.newCall(request).execute();
        log.info("****** FCM ResponseMessage : {}", response.code());
    }

    private String makeMessage(String targetToken, String title, String body) throws JsonParseException, JsonProcessingException {
        FcmMessage fcmMessage = FcmMessage.builder()
                .message(FcmMessage.Message.builder()
                        .token(targetToken)
                        .notification(FcmMessage.Notification.builder()
                                .title(title)
                                .body(body)
                                .image(null)
                                .build()
                        ).build()).validateOnly(false).build();

        return objectMapper.writeValueAsString(fcmMessage);
    }

    private String getAccessToken() throws IOException {
        GoogleCredentials googleCredentials = GoogleCredentials
                .fromStream(new ClassPathResource(firebaseConfigPath).getInputStream())
                .createScoped(List.of("https://www.googleapis.com/auth/cloud-platform"));

        googleCredentials.refreshIfExpired();
        String tokenValue = googleCredentials.getAccessToken().getTokenValue();
        return tokenValue;
    }
}
D. FcmMessage 클래스 생성
import lombok.AllArgsConstructor;
import lombok.Builder;
import lombok.Getter;

@Builder
@AllArgsConstructor
@Getter
public class FcmMessage {
    private boolean validateOnly;
    private Message message;

    @Builder
    @AllArgsConstructor
    @Getter
    public static class Message {
        private Notification notification;
        private String token;
    }

    @Builder
    @AllArgsConstructor
    @Getter
    public static class Notification {
        private String title;
        private String body;
        private String image;
    }
}
E. NotificationController 생성
import com.google.gson.Gson;
import com.google.gson.JsonObject;
import lombok.RequiredArgsConstructor;
import lombok.extern.log4j.Log4j2;
import org.springframework.web.bind.annotation.GetMapping;
import org.springframework.web.bind.annotation.PostMapping;
import org.springframework.web.bind.annotation.RequestBody;
import org.springframework.web.bind.annotation.RestController;

import java.io.IOException;

@RequiredArgsConstructor
@RestController
@Log4j2
public class NotificationController {

    private final FirebaseCloudMessageService firebaseCloudMessageService;

	// "Android > C. MyFirebaseMessagingService 클래스 추가"에 생성된 token 값을 targetToken 변수에 셋팅합니다.
    @PostMapping("/api/fcm")
    public String pushMessage(@RequestBody String jsonString) throws IOException {
        final String targetToken = "token 값 셋팅";
        JsonObject jsonObject = new Gson().fromJson(jsonString, JsonObject.class);

        log.info("***** Request Message : {}", jsonString);

        firebaseCloudMessageService.sendMessageTo(
                targetToken
                ,jsonObject.get("title").getAsString()
                ,jsonObject.get("body").getAsString()
        );

        return "Push Message Success";
    }

}
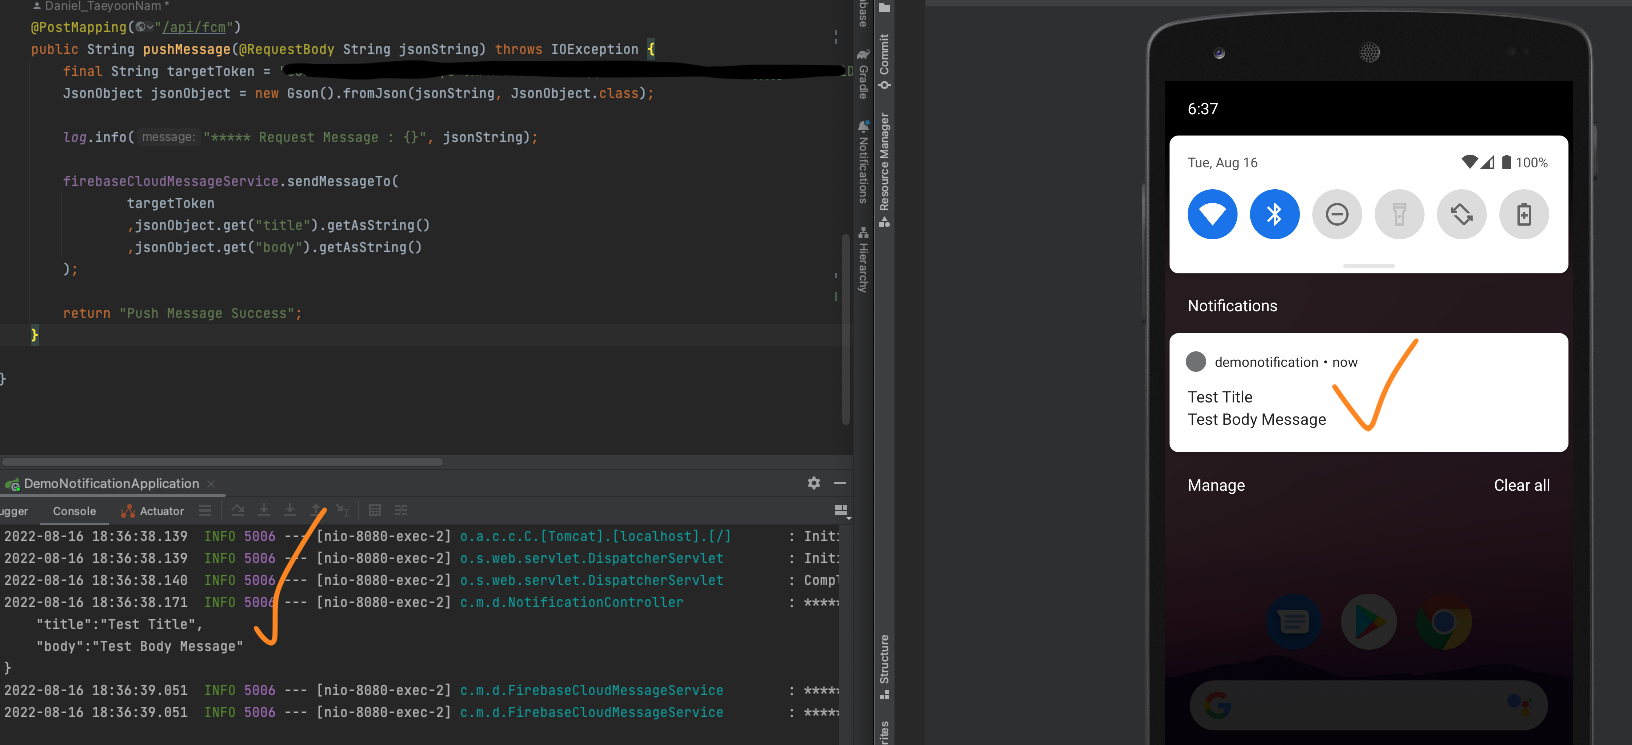
Test 결과
A. Postman 통해서 요청

B. Notification 결과
기타 참고
실습 참고주소
- Spring boot : https://firebase.google.com/docs/admin/setup?hl=ko#java_1
- 참고 Blog : https://sol-devlog.tistory.com/11
Firebase Push Notification에 대한 전반적인 이해는 아래 링크 주소를 참고해주시기 바랍니다.
- https://medium.com/@vdongbin/firebase를-이용한-push-notification-5c8a83932472
'Spring Boot' 카테고리의 다른 글
| Test Code 작성 시 요놈들은 뭘까 (0) | 2022.06.22 |
|---|